FAQs
To schedule a press run is easy. Gardena Valley News Print Facility operates its pressroom Sunday through Thursday night. To reserve a press time, click here or call the “PRINT ORDER DESK” 24 hours ahead of time at 310-329-6351 ext 120. The Print Desk is manned Monday to Thursday 2:00 pm until 8:00 pm. Ask for Kelly and he will place you on the schedule.
Since there are many factors when it comes to printing, we’ve set up a quote request form. Once you submit the form, we’ll get back to you within 1 business day with a quote.
Normally, jobs received by 5:00pm will be ready for pick up or delivery the next day. If your job requires any additional work such as bindery or any form of fulfillment, plan a turn around of 3 to 5 working days. You will be advised of your tentative completion date when you place your printing order.
Jobs received by 5:00 pm will get first priority on the press. Jobs received after that time will be processed when time allows. We do our best to assure everyone gets printed and delivered in a timely manner.
We work in a PDF (Portable Document Folder) workflow. Please submit all files for printing in a “Press Quality” PDF format.
The videos can be seen below. It will guide you from start to finish including importing images and creating a PDF.
1) Installing Workspace
2) Introduction To Paragraph Styles
3) Installing Paragraph Style
4) Column And Margin Setup
5) Importing And Linking Text
6) Preparing And Importing Pictures
7) RGB, CMYK & Grayscale
8) Managing Links
9) Collecting For Transport
10) Creating a PDF File
Most of today’s layout and assembly programs have an export to PDF function. InDesign and Quark make it easy to export to a PDF. You will find that option in the file menu. Just follow the step by step instructions within the program.
If you are running an older version of Quark or Page Maker you will need Adobe Acrobat Distiller installed on you system as well as a postscript driver. Please call us for detailed instructions. With some systems, it will be better if we make the PDF’s for you.
If you find that your black and white photographs print too dark, you are not alone. Dark pictures or tones, is the number one problem in digital workflow. There are several reasons for this, but the main two are:
- Today’s digital photographs are designed to print as heavily saturated RGB files on photo printers.
- Files right out of the camera are not adjusted to compensate for printing on newsprint. Lets take a look at a sample photograph so you can see what I am talking about.
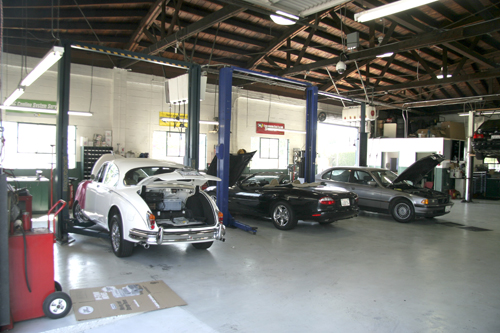
Looking at this photo you can see that it has some problems with exposure. Dark ceilings and very bright doors and window in the background.This photograph will be a challenge to print well on newsprint. This was taken with a 20D Canon SLR camera set on Auto and as a color RGB photo, it is not bad.
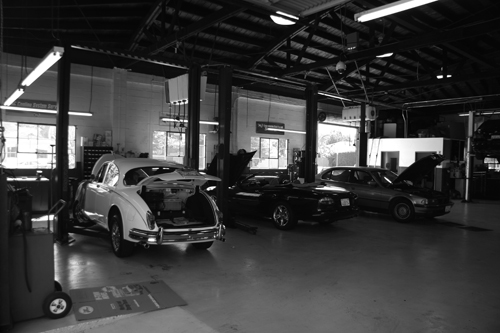
This is what the photo will look like if we just convert it to black and white on our direct to plate RIP. As you can see, it is very dark and we have lost a lot of the detail in the shadow and mid tone areas. This is because the original was not meant to be a black and white tone. This photo looks to be about 20% darker than you would expect it to be from looking at the color photo, and without adjustment to compensate for newsprint, it will gain another 15% to 20% more. Bottom line, unconverted and unadjusted photos will print as much as 40% darker than they appear.
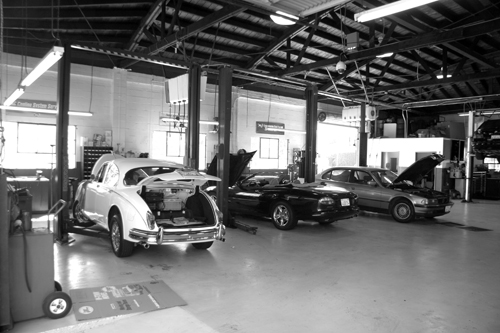
This is the same photo after it was converted to grayscale and adjusted for newsprint printing. Notice the increase in detail in the rooftop beams and the additional brightness and contrast in the photo. This photo will print much better than the untouched one above.
All digital photos will need to be adjusted in order for them to print properly. In general they will need to be converted first to “grayscale” and then lightened to compensate for printing on newsprint. To convert to grayscale go to Image/mode/grayscale and answer yes when asked to discard color in Photoshop.
To adjust your photos go to Image/adjustments/levels and you will see the following pop up with a histogram displaying the structure of the photo.
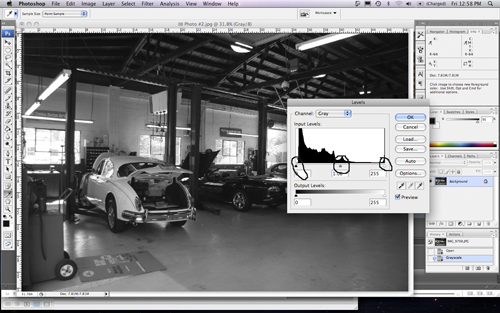
As you can see, the histogram is a graph of the photo. The left side is the shadow, or dark side, and the right is the hi-light, or light side of the photograph. With this photo, most of the histogram is on the left, or dark side.
You will also see three slider adjustments under the graph portion of the histogram. The right hand slider affects the hi-lights of the photo. The left slider affects the shadows of the photo, and the middle slider works with the middle tone.
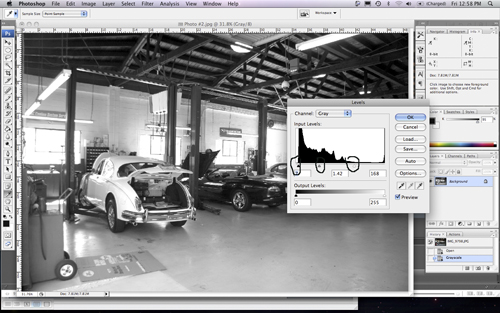
There are four easy steps to making the adjustments necessary for your photos to print will.
- Move the right slider in so it just makes contact with the edge of the graphic histogram on it far right hand side.
- Move the left slider to the right so it just makes contact with the left side of the histogram.
- Third, move the center slider to the left to lighten the entire tone. If it looks good on your screen, your photo will most likely still be to dark and you need to move the center slider to the left even more.
- Fourth, go back to the left slider and move it just a little back to the right to add contrast back into the photograph.
Last step is to sharpen and make sure your photo is linked in your document so when you make your PDF’s you are using your adjusted photo and not the screen resolution from the document.